![GAPTEQ Logo links weiss.png]](https://knowledgebase.gapteq.com/hs-fs/hubfs/GAPTEQ%20Logo%20links%20weiss.png?width=223&height=54&name=GAPTEQ%20Logo%20links%20weiss.png)
In this article you will read the following content:
File download from the GAPTEQ-Portal
Launch with the GAPTEQ SAMPLE APPS
1. File download from the GAPTEQ-Portal
- To start the installation of GAPTEQ, download the three software components listed. You will find them in the GAPTEQ portal under the menu item “Downloads”.
- GAPTEQ Designer.exe
Front-end tool from GAPTEQ. Here you can build your applications using drag and drop and control the user administration. - GAPTEQ Repository Server.exe
As a form server, it forms the heart of GAPTEQ. - GAPTEQ Web.exe
As a rendering engine, it makes your application available as a WebApp.
- GAPTEQ Designer.exe
2. Start installation
- You can now start the installation by double-clicking on the relevant file to open the installation wizard.

- Install the three software components one after the other. The order is not relevant.
- You can install the software in the default folder (C:\Program Files (x86)\GAPTEQ\GAPTEQ Designer x.y) or select a different folder via “Browse”.
- Follow the installation wizard, confirm the license conditions and close the wizard with “Finish” or “Install”.
Caution!
After the actual GAPTEQ web setup, the required .NET 6.0 Hosting Bundle is installed. The Hosting Bundle requires a restart of your machine. After the installation, the setup generates a message requesting a restart - carry this out!

If you already have the Hosting Bundle on your PC due to previous installations, be sure to select the “Repair” option in the setup message.

3. Activate/license GAPTEQ
Test GAPTEQ now for 30 days in the free TEST-Version and get to know the functionalities of the GAPTEQ Designer.
Alternatively, license GAPTEQ in the BUSINESS version for a fee and benefit from GAPTEQ support and expert tips at any time.
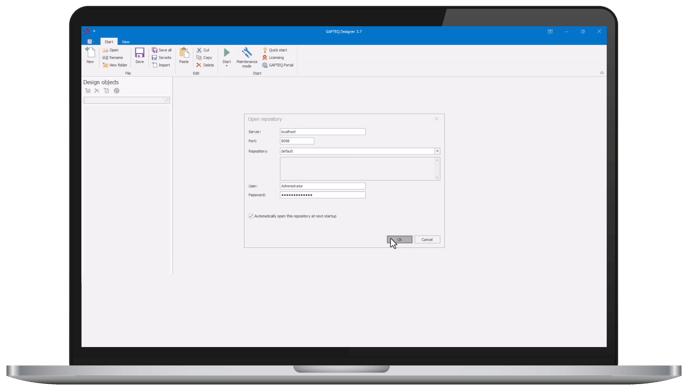
- When you open the GAPTEQ-Designer, a pop-up window appears to create an initial repository (project). For a quick start, the “default” repository (including stored access data) is available here by default.
- Then activate the TEST version using the “Activate TEST version” button or license GAPTEQ in the BUSINESS version using the “License BUSINESS version” button.
- Finally, follow the instructions of the wizard to complete the process.

4. Launch with the GAPTEQ SAMPLE APPS
DONE!
We now recommend that you start with the GAPTEQ SAMPLE APPS. Our sample applications will make it easier for you to enter the world of GAPTEQ applications.
Click here to go directly to the instructions: Start with the GAPTEQ SAMPLE APPS