Tutorial 1: The first project (repository)
This shows how to create an initial project (repository) in GAPTEQ, create the first pages and display them in the browser.
1. create a new repository
- To create a new repository (new project), select the “Create Repository” navigation item in the main menu of the GAPTEQ Designer. A wizard guides you through the necessary steps.


- The access data for the GAPTEQ server is entered (for the cloud version, this can be found at any time in the GAPTEQ portal in the subscriptions area)
Tip! You have two options for logging on to the repository server - via a port or http connection (recommendation: http connection, new since GAPTEQ 3.7). The following process is identical for both connection options.

- Case 1: If the GAPTEQ Designer is installed on the same computer as the GAPTEQ server, please enter localhost for Server.
- Case 2: Otherwise, select the name of the GAPTEQ server available in the network.
Attention!
The port for the GAPTEQ server is pre-assigned (8098) and can be retained.
The access data of a GAPTEQ user is expected for the user name and password. After installation, the default user “Administrator” is available, which you can use to authenticate yourself on the server.
Server: localhost
Port: 8098
User: Administrator
Password: Administrator
- First assign a name for your repository.
- In the following steps, you have the option of making settings for the visibility of your project and the desired access rights of the users/user groups.
Tip! You can initially accept the default settings here and adjust them later if necessary.

2. Create first Page
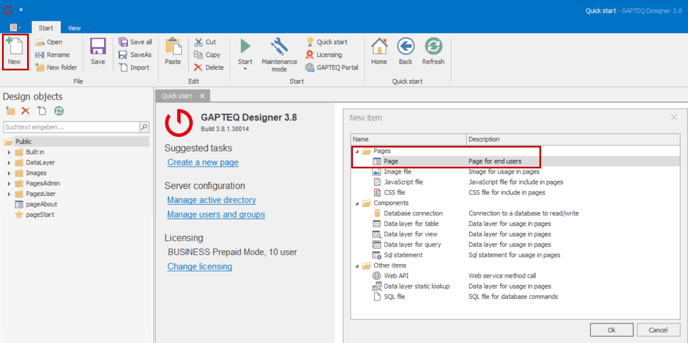
- A new page is created by clicking on the “New” button in the main menu. The “Page” item is selected in the following “New item” dialog.
- Now enter a file name and save the newly created page.
Attention! The names of the page objects and the directories in which they are stored are part of the URL in the application. Therefore, do not use any special characters and ideally no spaces in object names.

Each page created corresponds to a page of the web application that can be called up directly under this name. Pages, like all other objects in the Design Objects Explorer, can be stored in any structure and reorganized at any time using drag & drop.
3. Set page as start page
Each repository requires a defined start page that appears when the project is called up in the browser.
- Right-click on a page object in the Design Objects Explorer and click on “Set as main page” to set the selected page as the start page.
Tip! The set start page is marked with a yellow star symbol.

4. open the page in the browser
Although the page does not yet contain any components, it is immediately available after saving and can be displayed in the browser.
- By clicking on the green “Start” button in the main menu, the start page of the repository can be called up at any time and the progress of the programming can be seen. If no GAPTEQ components are positioned on the page, only an empty page is displayed.

4. placing components & linking pages
The available components are listed to the left of the open page in the GAPTEQ Designer.
- Simply drag & drop the first components onto the created page and position them as desired.
Tip! Start with simple components such as headlines or buttons. Some components require database access.

- If you have now created several pages, the easiest way to link two pages is to use a button and assign corresponding functionalities to it.
- In the Actions area, for example, the “clicked” event can now be used to link the two pages together.
Note! Each component has different events.
![GAPTEQ Logo links weiss.png]](https://knowledgebase.gapteq.com/hs-fs/hubfs/GAPTEQ%20Logo%20links%20weiss.png?width=223&height=54&name=GAPTEQ%20Logo%20links%20weiss.png)